Integrating External Data
Compatibility
- External data: MySQL (currently supported)
- Collector: 4.2.0.0 or later, with the Guanyun Collector module enabled
Integrating MySQL Data
Integration Steps Overview
-
Confirming the integration target: Identify the MySQL environment details required for integration, including the MySQL instance IP, database name, and data table name.
-
Determining the data collection location: Deploy Collector in the same network environment as the target MySQL host, and confirm the Collector IP used to collect data.
-
Requesting database access permissions: Contact your operations team to create a read-only monitoring account on the target MySQL host with the following requirements:
- Limit permissions to the target database and tables
- Grant only
SELECT - Allow access only from the Collector IP above
-
Allowing network access: Contact your operations team to allow the firewall rule from Collector to MySQL (Collector IP → MySQL IP:port).
-
Deploying or reusing Collector: Confirm whether a Collector is already available in the current environment, and reuse or deploy one as needed.
-
Configuring the data source: In the Guanyun Platform Data Integration lite app, configure the MySQL data source connection.
-
Generating database metrics: In the Guanyun Platform Metric System lite app, generate database metrics based on the integrated data source.
Step-by-Step Configuration
Step 1: Confirming the Integration Target
Before integration, please confirm the following information (used for database account authorization and platform configuration):
- MySQL instance IP
- Database name
- Table name
- Collector host IP (must be in the same network environment as MySQL)
Step 2: Preparing or Installing Collector
To pull MySQL data via Collector, ensure that Collector can reach the MySQL host over the network.
Option 1: Reusing an existing Collector (recommended)
If a Collector already exists in the current network environment, you can reuse it without reinstalling.
Confirm that the Guanyun Collector module is enabled:
-
Check module status:
grep 'guanyun_enabled' /opt/tingyun-collector/conf/collector.yaml -
If the output is
guanyun_enabled: false, change it to:guanyun_enabled: true -
Restart the Collector:
systemctl restart tingyun-collector
Option 2: Installing Collector (if no Collector is available)
-
Log in to Guanyun Platform.
-
In the left navigation bar, click All Apps, then click Deployment Status in the lite app list.
-
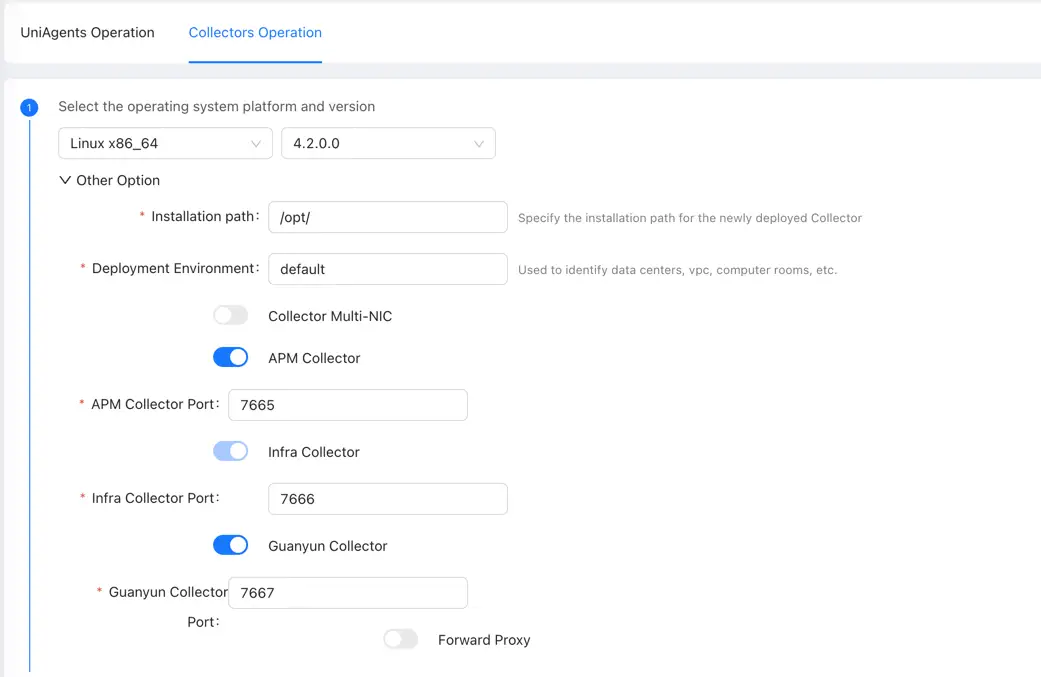
On the deployment status page, click the Collectors Operation tab at the top of the page.
-
Click Create in the upper right corner and configure the Collector parameters:
- You must enable Guanyun Collector to ingest monitoring data from external data sources.
-
Copy the installation script and run it on the target host to complete the installation.
Step 3: Requesting Database Access Permissions
To follow the principle of least privilege, create a read-only account in MySQL and grant read-only permissions for data collection.
-
Creating a monitoring account
Run the following command on the MySQL host (example only; update as needed):
CREATE USER 'tingyun_monitor_user'@'Collector IP' IDENTIFIED BY 'your_password';Parameters:
tingyun_monitor_user: Read-only user name (customizable).Collector IP: Replace with the actual Collector IP. Do not use%to avoid allowing arbitrary source hosts.your_password: Replace with a strong password.
-
Granting read-only permissions
Grant only
SELECTon the target database/tables (example only; update as needed):GRANT SELECT ON example_db.static_day TO 'tingyun_monitor_user'@'Collector IP';
GRANT SELECT ON example_db.static_hour TO 'tingyun_monitor_user'@'Collector IP';
FLUSH PRIVILEGES;
Step 4: Configuring Network and Port Rules
Ensure that Collector can access the MySQL instance. Contact your operations team to allow the following access rules:
| Source Address | Target Address | Target Port | Description |
|---|---|---|---|
| Collector Host | Guanyun Platform | 80 | Installing Collector and uploading data to Guanyun Platform |
| Collector Host | MySQL Host | 3306 | Pulling MySQL data |
Step 5: Configuring the Data Source
-
Log in to Guanyun Platform.
-
In the left navigation bar, click All Apps, then click Data Integration in the lite app list.
-
On the Data Integration page, click the Data Access tab and select Database under External Data.
-
On the Database data access page, fill in the connection parameters and confirm the following before saving:
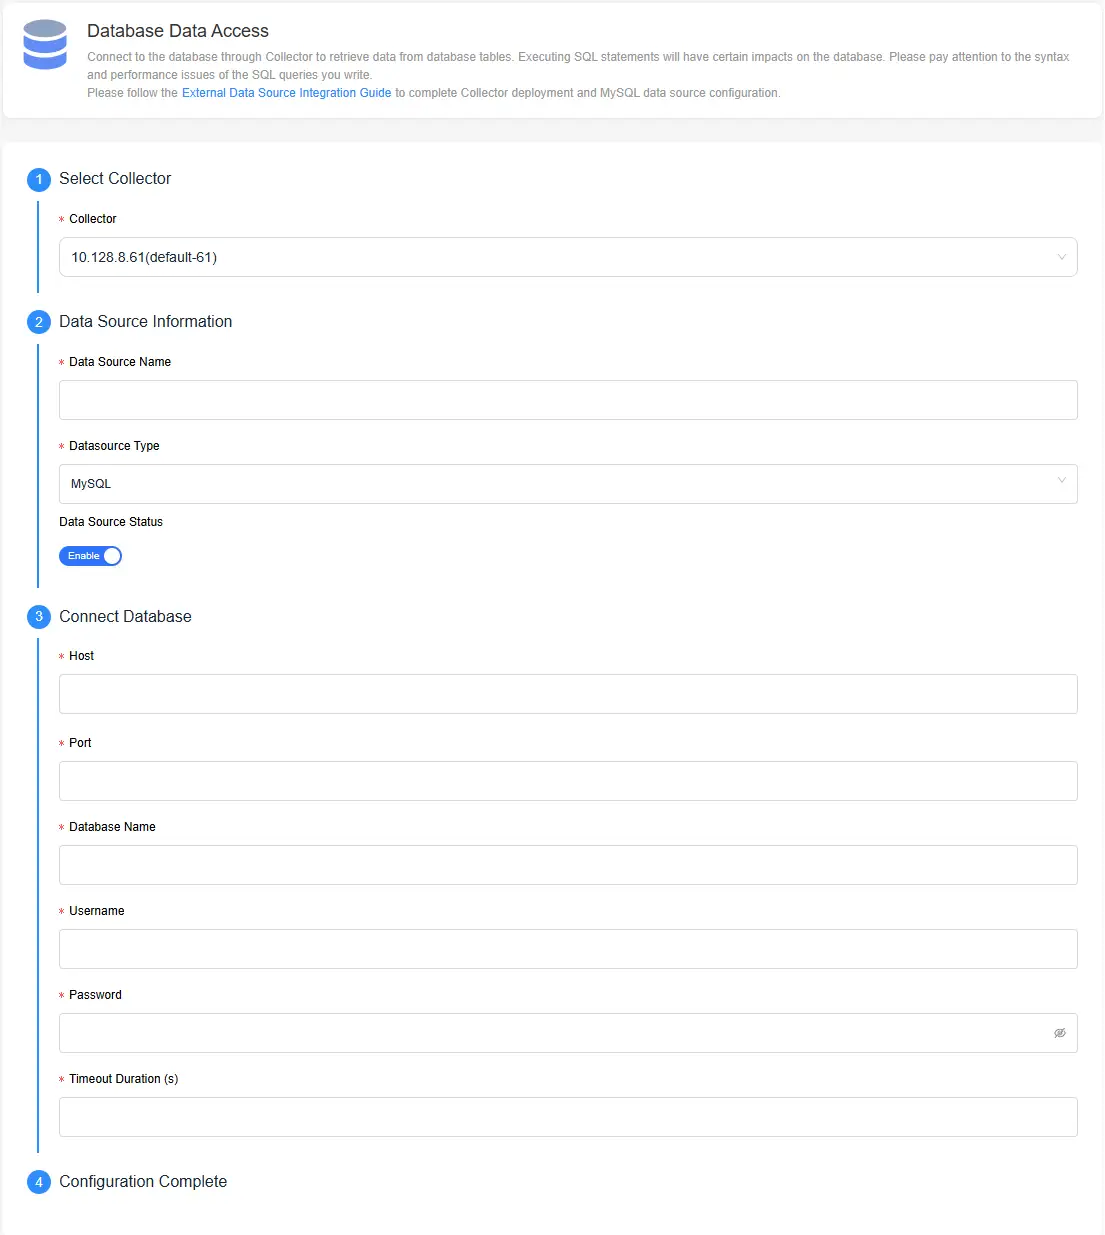
- Username/Password: The MySQL read-only monitoring account and password created in Step 3.
- Collector: The Collector you confirmed in Step 2.
Step 6: Generating Database Metrics
-
In the left navigation bar, click All Apps, then click Metric System in the lite app list.
-
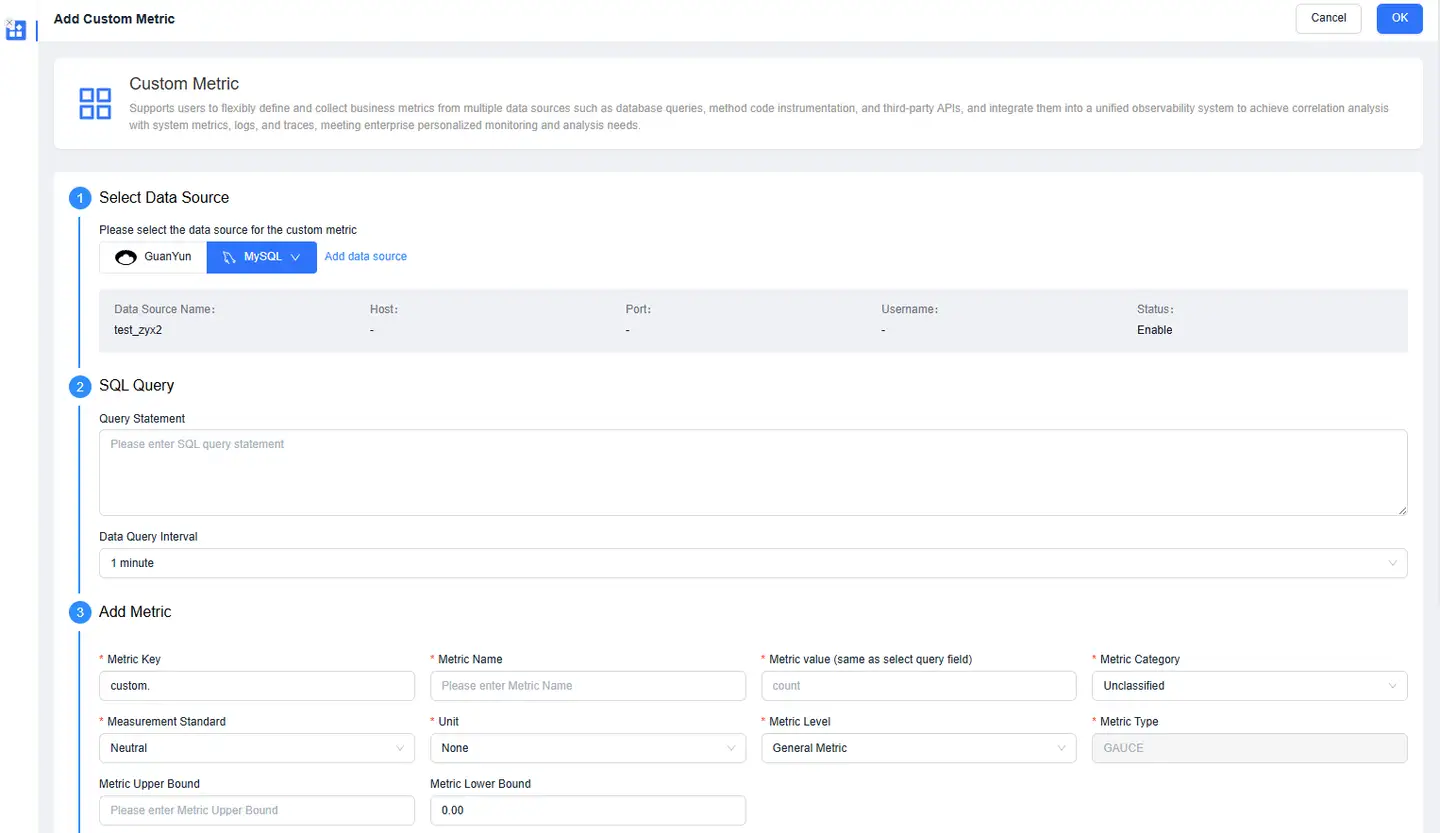
Click Generate. On the Add Custom Metric page, complete the following configuration:
- Data source: Select the MySQL data source configured in Step 5.
- SQL query: Configure the query statement used for data collection.
- Metric settings: Set the metric name, unit, dimensions, and other parameters.
-
Click OK.
Step 7: Viewing Data in Guanyun Platform
Go to the Data Explorer lite app, select METRIC as the data model, and query the metric name configured above.