Troubleshooting
Viewing Collector Logs
Enter the container:
kubectl exec -it tingyun-collector-0 -n tingyun -- bash
Inside the container, run:
# APM Collector logs
cd /opt/tingyun-collector/logs/apm
# Infra Collector logs
cd /opt/tingyun-collector/logs/infra
# Guanyun Collector logs
cd /opt/tingyun-collector/logs/guanyun
What permissions are required to install the Agent?
Installing the Agent requires MutatingWebhookConfiguration, ClusterRoleBinding, and ClusterRole permissions.
-
The principle of injecting the APM Agent is to install a Webhook service in the cluster, which intercepts Pod startup commands and injects the APM Agent into the specified Pod by adding an initContainer. Installing the Webhook service requires MutatingWebhookConfiguration permissions.
To implement the function of limiting the number of Agent injections per Deployment, the Webhook service needs to obtain information about Pods that have already been injected in the cluster via the Kubernetes API, which requires read-only permissions for Pod resources, and assign permissions to the account used by the Agent.
Defining read permissions for resources requires ClusterRole permissions, and assigning permissions to the account used by the Agent requires ClusterRoleBinding permissions.
-
The Infra Agent integrates components for monitoring Kubernetes cluster information. The principle is to obtain relevant information in the cluster via the Kubernetes API, which requires read permissions for specific resources and assigning permissions to the account used by the Agent.
Defining read permissions for resources requires ClusterRole permissions, and assigning permissions to the account used by the Agent requires ClusterRoleBinding permissions.
To minimize the permissions of the Agent, the Infra Agent only requests list, watch, and get read operations for Pod, Namespace, and other entity resources when using ClusterRole permissions. To ensure it can access the Kubernetes API server from within the Pod, it needs create permissions for tokenreviews and subjectaccessreviews resources.
If the corresponding permissions are missing, the following errors will be reported:
 Error from server (Forbidden): error when retrieving current configuration of:
 Resource: "admissionregistration.k8s.io/v1beta1, Resource=mutatingwebhookconfigurations", GroupVersionKind: "admissionregistration.k8s.io/v1beta1, Kind=MutatingWebhookConfiguration"
 Name: "tingyun-agent-webhook", Namespace: ""
 from server for: "./agent.yaml": mutatingwebhookconfigurations.admissionregistration.k8s.io "tingyun-agent-webhook" is forbidden:
 User "limited" cannot get resource "mutatingwebhookconfigurations" in API group "admissionregistration.k8s.io" at the cluster scope

 Error from server (Forbidden): error when retrieving current configuration of:
 Resource: "rbac.authorization.k8s.io/v1, Resource=clusterroles", GroupVersionKind: "rbac.authorization.k8s.io/v1, Kind=ClusterRole"
 Name: "tingyun-k8s-monitor", Namespace: ""
 from server for: "./agent.yaml": clusterroles.rbac.authorization.k8s.io "tingyun-k8s-monitor" is forbidden:
 User "limited" cannot get resource "clusterroles" in API group "rbac.authorization.k8s.io" at the cluster scope

 Error from server (Forbidden): error when retrieving current configuration of:
 Resource: "rbac.authorization.k8s.io/v1, Resource=clusterrolebindings", GroupVersionKind: "rbac.authorization.k8s.io/v1, Kind=ClusterRoleBinding"
 Name: "tingyun-k8s-monitor", Namespace: ""
 from server for: "./agent.yaml": clusterrolebindings.rbac.authorization.k8s.io "tingyun-k8s-monitor" is forbidden:
 User "limited" cannot get resource "clusterrolebindings" in API group "rbac.authorization.k8s.io" at the cluster scope
If you encounter the above errors, search for the keyword admin permissions in the yaml file used for installation, and submit the relevant yaml content to the cluster administrator for review and execution.
Troubleshooting APM Agent Injection Issues
Business Pod Fails to Start
Check if the Pod description information is abnormal:
kubectl describe pod [application pod name] -n [namespace]
Check if the event information is abnormal:
kubectl get event -n [namespace]
Check the Pod InitContainer logs:
kubectl logs [application pod name] -c tingyun-oneagent -n [namespace]
Common causes:
-
InitContainer reports
exec /bin/sh exec format error, indicating that the image architecture does not match the current Node CPU architecture.Check the image CPU architecture. If there are both ARM64 and AMD64 Nodes in the cluster, enable the image manifest function and upload images for both architectures.
-
Node CPU or memory is insufficient, causing startup failure. Use
kubectl top nodeto check Node resource status. -
After adding the Agent, process CPU and memory usage may increase slightly, possibly exceeding the limit values in the yaml file. Check the limit values in the yaml.
-
After adding the Agent, startup time may increase, possibly triggering Pod health check failures. Check the health check strategy.
Business Pod Starts Successfully, Injection Successful, but Application Access Fails
Common causes:
-
Agent starts slowly. Check the application logs and Agent logs.
-
Agent compatibility issues. Check the application logs and Agent logs.
Business Pod Starts Successfully, Injection Fails
APM Agent injection is divided into two main stages:
-
Mount the Agent image file to the application Pod file system.
-
After the application Pod starts, the application process loads the Agent according to the language type.
Use the following command to check if the application Pod has mounted the Agent image file:
kubectl describe pod [application pod name] -n [namespace] | grep tingyun-oneagent
For example, the following output indicates that it is mounted:
LD_PRELOAD: /opt/tingyun-oneagent/lib/libinterceptor.so
/opt/tingyun-oneagent from oneagent-volume (rw)
If the Agent image file is not mounted, troubleshoot according to steps 1-6. If it is mounted, troubleshoot according to steps 7-12.
Step 1. Check the running status of the Tingyun Pods.
Check the status of the Agent Pods:
kubectl get pod -n tingyun
The output should be similar to:
NAME                               READY   STATUS    RESTARTS   AGE
cluster-metrics-76db8d69fd-pnv86   1/1     Running   0          23h
kubelet-metrics-ls847              1/1     Running   0          23h
tingyun-collector-0                1/1     Running   0          23h
tingyun-linux-agent-xk8pp          1/1     Running   0          22h
tingyun-webhook-6b96bc4f68-cggd6   1/1     Running   0          23h
tingyun-webhook-xxx should be in Running status. If not, use kubectl describe pod tingyun-webhook-xxx -n tingyun to check the pod description information. Common causes include image source network issues, image CPU architecture mismatch (ARM64 or AMD64), or insufficient CPU or memory resources in the cluster.
Check the status of the Agent services:
kubectl get svc -n tingyun
The output should be similar to:
NAME                        TYPE        CLUSTER-IP      EXTERNAL-IP   PORT(S)             AGE
cluster-metrics-service     ClusterIP   10.98.193.238   <none>        80/TCP              23h
tingyun-collector-service   ClusterIP   10.107.120.36   <none>        7665/TCP,7666/TCP   23h
tingyun-webhook-service     ClusterIP   10.99.222.1     <none>        443/TCP             23h
The list should include tingyun-webhook-service, tingyun-collector-service, and cluster-metrics-service.
Step 2. Check the Label of the Namespace where the application to be injected is located.
kubectl get namespace -L tingyun-injection
The output should be similar to:
NAME              STATUS   AGE   TINGYUN-INJECTION
default           Active   20d
test              Active   9d    enabled
tingyun           Active   8d
The tingyun-injection label of the Namespace where the application to be injected is located should be enabled.
Step 3. Check the Label of the Pod where the application to be injected is located.
kubectl describe pod www.tomcat.com-689b69775f-s7tcl -n test
The output should be similar to:
Name:           www.tomcat.com-689b69775f-s7tcl
Namespace:      test
Labels:         tingyun-agent-injected=enabled
Annotations:    tingyun-agent-id: 5022f18b-1944-11ed-b5a0-02427e459e42
The tingyun-agent-injected label of the Pod where the application to be injected is located should be enabled.
Step 4. Check whether the Webhook exists or is an old version of the Webhook.
kubectl get MutatingWebhookConfiguration | grep tingyun-agent-webhook
The output should be similar to:
tingyun-agent-webhook 2022-05-08T04:50:33Z
If there is no output, it means the Webhook installation failed. If there is output, check the creation date of the Webhook. When deleting the old Agent and reinstalling, the Webhook may not be updated due to permission issues or incomplete uninstallation.
Step 5. View the running logs of the webhook.
kubectl logs tingyun-webhook-xxx -n tingyun
The logs of tingyun-webhook-xxx should contain modification records for the corresponding Pod. The following is a normal injection log when a Pod starts:
AdmissionResponse: patch=[{"op":"add","path":"/spec/containers/0/volumeMounts/-","value":{"name":"oneagent-volume","mountPath":"/opt/tingyun-oneagent"}},{"op":"add","path":"/spec/containers/0/env","value":[{"name":"LD_PRELOAD","value":"/opt/tingyun-oneagent/lib/libinterceptor.so"},{"name":"TINGYUN_AGENT_ROOT","value":"/opt/tingyun-oneagent"},{"name":"TINGYUN_K8S_MODE","value":"true"},{"name":"TINGYUN_APP_NAME","value":"www.tomcat.com(test)"},{"name":"TINGYUN_NODE_NAME","valueFrom":{"fieldRef":{"fieldPath":"spec.nodeName"}}},{"name":"TINGYUN_INSTANCE_NAME","valueFrom":{"fieldRef":{"apiVersion":"v1","fieldPath":"metadata.name"}}},{"name":"TINGYUN_POD_NAMESPACE","valueFrom":{"fieldRef":{"fieldPath":"metadata.namespace"}}},{"name":"TINGYUN_POD_IP","valueFrom":{"fieldRef":{"fieldPath":"status.podIP"}}}]},{"op":"add","path":"/spec/initContainers","value":[{"name":"tingyun-oneagent","image":"goinline.cn/tingyunagent/oneagent:2.2.0.0","command":["sh"],"args":["-c","tar -xzf oneagent.tar.gz -C /oneagent \u0026\u0026 /oneagent/bin/init"],"env":[{"name":"TINGYUN_LICENSE_KEY","value":"9OgQXob4VGGFFYcm"},{"name":"TINGYUN_COLLECTORS","value":"tingyun-collector.tingyun.svc:7665"},{"name":"TINGYUN_DEFAULT_BUSINESS_SYSTEM","value":"k8scen"},{"name":"TINGYUN_WEBHOOK_SVC","value":"tingyun-agent.tingyun.svc:443"},{"name":"TINGYUN_APP_NAME","value":"www.tomcat.com(test)"},{"name":"TINGYUN_INSTANCE_NAME","valueFrom":{"fieldRef":{"apiVersion":"v1","fieldPath":"metadata.name"}}}],"resources":{"limits":{"cpu":"1","memory":"500Mi"},"requests":{"cpu":"1","memory":"200Mi"}},"volumeMounts":[{"name":"oneagent-volume","mountPath":"/oneagent"}],"terminationMessagePath":"/dev/termination-log","terminationMessagePolicy":"File","imagePullPolicy":"IfNotPresent"}]},{"op":"add","path":"/spec/volumes/-","value":{"name":"oneagent-volume","emptyDir":{}}},{"op":"add","path":"/metadata/annotations","value":{"tingyun-injected-status":"injected"}}]
If the logs contain a large number of TLS handshake error from xxx: remote error: tls: bad certificate logs, possible causes include:
- The Webhook was not updated successfully when upgrading the Agent due to permission issues.
- The namespace name in the yaml file was manually changed, causing the webhook to not match the correct domain name.
- The SSL certificate in the yaml file was manually changed, causing the certificate to fail verification.
Solution: Please regenerate a new yaml using the Tingyun platform, ensure the namespace in the yaml matches the actual deployment, do not manually modify the certificate information, and then reinstall the Tingyun Agent with cluster administrator permissions.
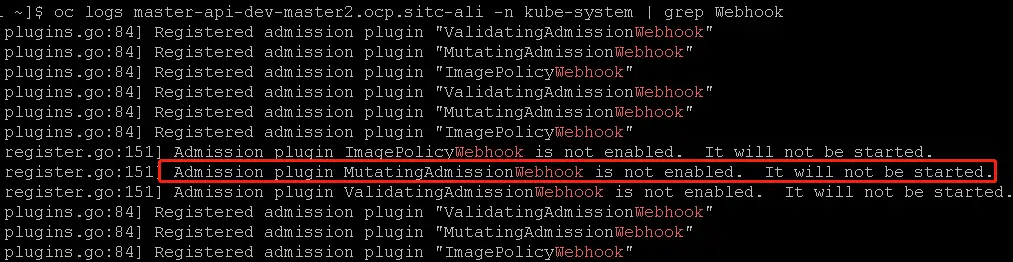
If logs contain only startup configuration information and nothing else
This indicates that the MutatingAdmissionWebhook plugin is not enabled in the cluster, or the Webhook installation failed or is misconfigured.
-
Check if the MutatingAdmissionWebhook plugin is enabled.
The cluster must enable the MutatingAdmissionWebhook plugin. On OpenShift 3.x, it is disabled by default. Please contact the cluster administrator to confirm the status of the MutatingAdmissionWebhook plugin.
For example: On OpenShift 3.11, the API-Server logs show the plugin is disabled.
For example: On MiniKube, the API-Server logs show the plugin is enabled.

-
Check if the Webhook service is working properly
Find a business Pod with wget or curl, and verify if the Webhook service is working:
kubectl exec -it [application pod name] -n [namespace] -- \
wget --no-check-certificate https://tingyun-webhook-service.tingyun.svc/healthz
or
kubectl exec -it [application pod name] -n [namespace] -- \
curl -k -v https://tingyun-webhook-service.tingyun.svc/healthz
You should see
Connected to tingyun-webhook-service.tingyun.svc (10.98.85.228) port 443and200 OK. If not, check the error message returned by curl or wget.Common reasons for failure include: DNS resolution failure, unable to establish connection, etc. Please contact the cluster administrator to resolve DNS and network issues.
Step 6. View the logs of the Kubernetes cluster API-Server.
If there is no DNS issue and still no logs, check the API-Server logs for keywords related to tingyun.
kubectl logs kube-apiserver-minikube -n kube-system | grep tingyun-webhook
For example, the following error may be returned:
W1109 16:56:46.147598       1 dispatcher.go:67] Failed calling webhook: failing open tingyun-webhook-service.tingyun.svc:
failed calling admission webhook "tingyun-webhook-service.tingyun.svc":
Post https://tingyun-webhook-service.tingyun.svc:443/mutate?timeout=30s: dial tcp 10.84.93.142:443: connect: connection refused
If there is no kube-apiserver-xxx pod in kube-system, the Kubernetes cluster has been customized. Please contact the cluster administrator to confirm the API-Server application and log path.
If there is a kube-apiserver-xxx pod in kube-system but you cannot get the API-Server logs, ssh to the Node where kube-apiserver-xxx is located and check the logs as files.
For example:
sudo ls -l /var/log/pods/
sudo ls -l /var/log/pods/kube-system_kube-apiserver-box_3083cabb3f2a9f1b8072e250c84965cd/kube-apiserver/
sudo cat /var/log/pods/kube-system_kube-apiserver-box_3083cabb3f2a9f1b8072e250c84965cd/kube-apiserver/12.log
Step 7. Check if the Pod description of the injected application contains tingyun-oneagent.
The Pod of the injected application should contain an Init Container named tingyun-oneagent and should mount the file system at /opt/tingyun-oneagent.
The following is the Pod description in a normal injection state:
$ kubectl describe pod www.tomcat.com-689b69775f-s7tcl  -n test
Name:           www.tomcat.com-689b69775f-s7tcl
Namespace:      test
Labels:         app=tomcat
                pod-template-hash=689b69775f
                tingyun-agent-injected=true
Annotations:    tingyun-injected-status: injected
Status:         Pending
Controlled By:  ReplicaSet/www.tomcat.com-689b69775f
Init Containers:
  tingyun-oneagent:
    Image:      tingyunagent/oneagent:2.2.0.0
    Command:
      sh
    Args:
      -c
      tar -xzf oneagent.tar.gz -C /oneagent && /oneagent/bin/init
    Environment:
      TINGYUN_LICENSE_KEY:              9OgQXob4VGGFFYcm
      TINGYUN_COLLECTORS:               tingyun-collector.tingyun.svc:7665
      TINGYUN_DEFAULT_BUSINESS_SYSTEM:  k8scen
      TINGYUN_APP_NAME:                 www.tomcat.com(test)
      TINGYUN_INSTANCE_NAME:            www.tomcat.com-689b69775f-s7tcl (v1:metadata.name)
    Mounts:
      /oneagent from oneagent-volume (rw)
      /var/run/secrets/kubernetes.io/serviceaccount from default-token-d2gn4 (ro)
Containers:
  tomcat:
    Image:      tomcat
    Port:       80/TCP
    Host Port:  0/TCP
    Environment:
      LD_PRELOAD:             /opt/tingyun-oneagent/lib/libinterceptor.so
      TINGYUN_AGENT_ROOT:     /opt/tingyun-oneagent
      TINGYUN_K8S_MODE:       true
      TINGYUN_APP_NAME:       www.tomcat.com(test)
      TINGYUN_NODE_NAME:       (v1:spec.nodeName)
      TINGYUN_INSTANCE_NAME:  www.tomcat.com-689b69775f-s7tcl (v1:metadata.name)
      TINGYUN_POD_NAMESPACE:  test (v1:metadata.namespace)
      TINGYUN_POD_IP:          (v1:status.podIP)
    Mounts:
      /opt/tingyun-oneagent from oneagent-volume (rw)
      /var/run/secrets/kubernetes.io/serviceaccount from default-token-d2gn4 (ro)
Conditions:
  Type           Status
  PodScheduled   False
Volumes:
  default-token-d2gn4:
    Type:        Secret (a volume populated by a Secret)
    SecretName:  default-token-d2gn4
    Optional:    false
  oneagent-volume:
    Type:        EmptyDir (a temporary directory that shares a pod's lifetime)
    Medium:
    SizeLimit:   <unset>
Step 8. Enter the application container and check whether /opt/tingyun-oneagent is mounted successfully.
$ kubectl exec -it www.tomcat.com-689b69775f-s7tcl -n test -- bash
Defaulted container "tomcat" out of: tomcat, tingyun-oneagent (init)

# ls /opt/tingyun-oneagent/
agent  bin  conf  data	lib  logs  run
The container of the injected application should contain /opt/tingyun-oneagent.
Step 9. Enter the application container and check /opt/tingyun-oneagent/logs/oneagent/preload.log.
cat /opt/tingyun-oneagent/logs/oneagent/preload.log
If the preload.log is set to debug level, you should see logs like (pid:xxx) DEBUG process start.
If there is no process start record for the corresponding process, it means the LD_PRELOAD environment variable was cleared or overwritten by the startup script or parent process.
Solution: Only supported in version 2.5.6.2 and above and when the container environment is glibc: Add a label to the deployment: tingyun-ldso-preload: "true"
The preload log for Java applications should contain JNI_CreateJavaVM, for example:
2022-05-16 06:05:22.500 98b6065442(pid:9,uid:0) DEBUG App Matched: dirname /usr/local/tomcat/bin/catalina.sh
...
2022-05-16 06:05:22.517 98b6065442(pid:1,uid:0) INFO on JNI_CreateJavaVM
...
Step 10. Enter the application container and check whether the application process has loaded libinterceptor.so.
The application process name depends on the language type, usually:
- For Java applications, the process name is java.
- For .NET Core applications, the process name is dotnet.
- For PHP applications, the process name is php-fpm.
# ps -ef | grep java
# cat /proc/[pid]/maps | grep tingyun
The maps file of the application process should contain /opt/tingyun-oneagent/lib/libinterceptor.so.
If the maps file of the application process does not contain /opt/tingyun-oneagent/lib/libinterceptor.so, it means the LD_PRELOAD environment variable was cleared or overwritten by the startup script or parent process.
Solution: Only supported in version 2.5.6.2 and above and when the container environment is glibc: Add a label to the deployment: tingyun-ldso-preload: "true"
If it is a Java application, the maps file of the process should contain tingyun-agent-java.
For example, the following is a normal state:
ps -ef | grep java
root           1       0  1 06:05 ?        00:00:10 /usr/local/openjdk-11/bin/java ...
cat /proc/1/maps | grep tingyun
7fa10807a000-7fa10807b000 r--s ... /opt/tingyun-oneagent/lib/libinterceptor.so
Step 11. Enter the application container and check whether there are Agent log files under /opt/tingyun-oneagent/logs/agent/.
ls -l /opt/tingyun-oneagent/logs/agent/
The container of the injected application should contain log files under /opt/tingyun-oneagent/logs/agent.
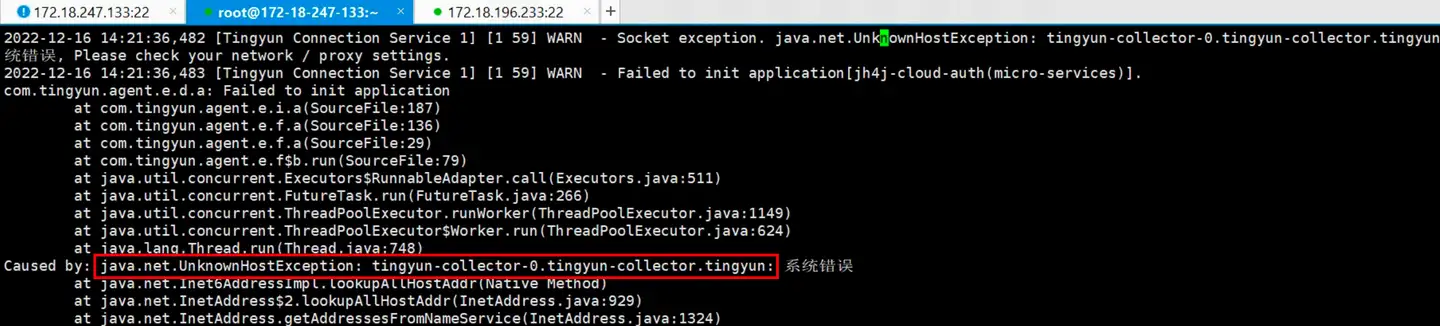
Step 12. Check the Agent logs for errors communicating with the Collector.
vi /opt/tingyun-oneagent/logs/agent/java-agent-98b6065442730569998e3f6c89af916bdab7cb36c8edafe85059a8e57ef4a2e7-1.log
If the business application Pod uses hostNetwork mode, it may fail to communicate with the Collector due to inability to resolve the cluster internal domain name of the collector. In this case, you need to deploy the Collector independently outside the cluster, and modify pod-init.sh in tingyun-injector-config in tingyunagent.yaml to change the Collector address in the Agent configuration file in this Pod to the IP of the independently deployed Collector.
Error example:
Below, change the collector used by the application named host-network-app(default) to 192.168.5.1:7665:
# APM Agent - Agent Configuration File
# configmap.yaml
# tingyun-agent configuration items

apiVersion: v1
kind: ConfigMap
metadata:
  name: tingyun-injector-config
  namespace: tingyun
data:
  pod-init.sh: |
    #!/bin/sh
    if [ "${TINGYUN_APP_NAME}" = "host-network-app(default)" ]; then
        sed -i -e "s/collectors=.*/collectors=192.168.5.1:7665/" ${ONEAGENT_CONF}
    fi
Then update using the yaml file.
kubectl apply -f tingyunagent.yaml