Collector Online Deployment
Before deploying Agents for various languages, please deploy Collector first. UniAgent and Agent Collector no longer support the Tingyun platform. If migrating from the Tingyun platform, you need to reinstall.
Agent Collector (hereinafter referred to as Collector) is composed of APM Collector, Infra Collector, 12 component Agents, and Guanyun Collector.
The 12 component Agents are Apache HTTP Server, Nginx, MySQL, Oracle, Redis, SNMP, PostgreSQL, MongoDB, Elasticsearch, RabbitMQ, Kafka, and Network component Agents, responsible for collecting performance data of corresponding components. Among them, the Network component Agent is responsible for collecting HTTP, TCP, and ICMP protocol data. Infra Collector is responsible for collecting and summarizing host performance data, component performance data, and protocol data collected by UniAgent.
Guanyun Collector is responsible for integrating monitoring data from Zabbix, Prometheus, Opentelemetry, and more.
Multiple Agent Collectors can be deployed in a Guanyun Platform system. When deploying multiple Collectors in the same environment, you need to ensure that the versions of multiple Collectors are the same. When upgrading Collectors, you should upgrade all Collectors as soon as possible to ensure consistent functionality.
Preparing Host Resources
The recommended configuration for the host deploying Collector is as follows:
- Operating System: Requires systemd service, recommended Linux distributions: CentOS 7 and above, Redhat 7 and above, Ubuntu 18 and above
- CPU: 4 Cores and above
- Physical Memory: 8GB and above
The number of traces that a single Collector can process per second is related to the number of spans in the trace. The more spans in a single trace, the more computing resources are needed. A Collector deployed on a 4 Core, 8GB machine can typically handle 4000 TPS of trace data.
CPU usage is also related to the number of application instances related to Collector. The more application instances, the more computing resources are needed.
In practice, we recommend calculating the number of Collectors that need to be deployed according to the following formula:
Number of Collectors = Max(Total number of application instances/100, Peak TPS in a day/4000) + 1
Confirming Environment Information
⚠️ Verify network connectivity between the platform server and the server where Collector is deployed.
⚠️ Confirm whether the CPU of the server where Collector is deployed is ARM64 or x86_64 architecture, and select the version consistent with the server CPU architecture on the installation page.
⚠️ All operations on the Collector server side require root privileges.
Configuring Network Policies
⚠️ The following are example IP addresses. Please configure network policies according to the actual addresses in your project.

| Source Address | Target Address | Open Port | Description |
|---|---|---|---|
| 192.168.5.2 | 192.168.5.1 | 80 | Collector installation and data upload to platform |
| 192.168.5.3 | 192.168.5.1 | 80 | Agent installation |
| 192.168.5.3 | 192.168.5.2 | 7665,7666 | Backend application Agent pushes data to Collector, APM Collector uses port 7665, Infra Collector uses port 7666 |
| 192.168.5.3 | 192.168.5.2 | 7667 or other ports | Port 7667 needs to be opened to integrate OpenTelemetry Trace data, other ports need to be opened to integrate Prometheus Write data, which can be customized |
| Users | 192.168.5.1 | 80 | Platform access |
Deployment Steps
-
Log in to the platform and select "All Applications > Deployment Status > Collectors Management" in the left navigation bar.
-
Click "Add" in the upper right corner of the Collectors Management tab and configure Collector parameters.
-
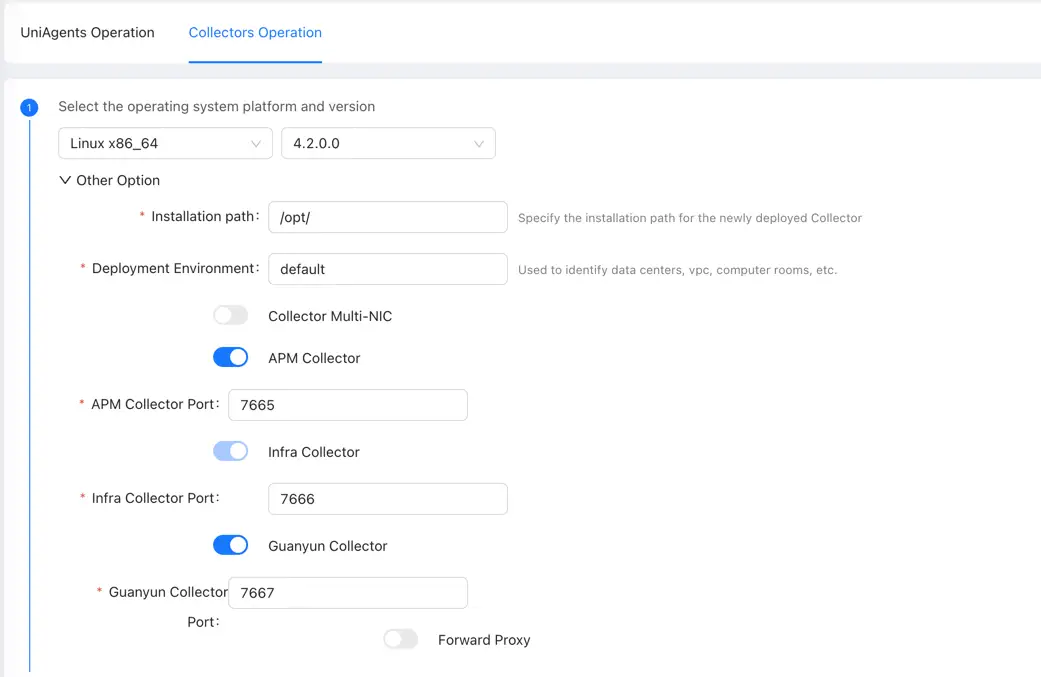
Select operating system CPU type: Linux x86_64 or Linux ARM64.
-
Select Collector version: During on-premises deployment, the Collector installation package needs to be uploaded in advance by the super administrator admin logging into the system before the version number can be displayed here.
-
Installation path: The path need to start with /, and the path can only contain letters, numbers, underscores, and hyphens. The default installation path is the opt directory. If there are no special requirements, it is recommended not to modify it.
-
⚠️ Deployment Environment: Used to identify the data center, VPC, and computer room where Collector is located. Multiple Collectors in the same deployment environment will be load balanced and fail over. Therefore, it is recommended not to use the default value. You can write according to the actual situation, for example: shenzheData, shanghaiData. When deploying in multiple environments (such as different computer rooms, test/production), the deployment environment need to use different values, otherwise it will cause the Agent to direct to the wrong Collector address and fail to establish a connection, connection is intermittent, the Agent obtains the wrong configuration, generates cross-computer room or network segment network traffic and other faults.
-
⚠️ Collector with multiple network cards: When the host where Collector is deployed has multiple external IPs, you can specify which IP to use to communicate with UniAgent. The IP address needs to be in the same network segment as the IP address of UniAgent. If the IP is specified incorrectly, it may cause the Agent and Collector network to be disconnected, cross-network segment traffic, and other problems.
-
APM Collector: Responsible for interacting with APM application Agents, using port 7665 by default.
-
Infra Collector: Responsible for receiving process, disk, network and other data collected by Infra host Agents, using port 7666 by default.
-
Guanyun Collector: Responsible for receiving data from Zabbix, Prometheus, Opentelemetry, external data sources, etc., using port 7667 by default.
If there are no special requirements for the above 3 ports, it is recommended not to modify them. If you modify them, you need to adjust the corresponding network policies that are configured.
-
-
Download Collector installation script.
-
Method 1: Click Generate, the system will generate a command. After clicking copy on the right, execute this command on the target server. The Token valid time is 10 minutes. After expiration, the command cannot be executed. You need to refresh the page to get a new command.
-
Method 2: When the network is disconnected, you can directly click Download on the right to download the installation script and upload the installation script to the target server.
-
-
Install Collector.
Execute the installation script downloaded in the above steps. Since you need to install an auto-start service in the system, you need root permissions to install.
If you need to specify installation parameters, execute
tingyun-agent-xxx-install.sh --helpto view the supported installation parameters.--install-path=/path/to If the path does not exist, it will be created automatically.
--runas-user=<user> The user needs to exist; if not, it needs to be manually created.
--runas-group=<group> Optional. It will be the same as the user name when empty.
--set-license_key=<value> Set license_key value in collector.yaml
--set-zone_name=<value> Set zone_name value in collector.yaml
--set-collector_ip=<value> Set collector_ip value in collector.yaml
--set-apm_enabled=<true/false> Set apm_enabled value in collector.yaml
--set-apm_port=<value> Set apm_port value in collector.yaml
--set-apm_jvm_args="<jvm args>" Set apm_jvm_args value in collector.yaml
--set-infra_enabled=<true/false> Set infra_enabled value in collector.yaml
--set-infra_port=<value> Set infra_port value in collector.yaml
--set-guanyun_enabled=<true/false> Set guanyun_enabled value in collector.yaml
--set-guanyun_port=<value> Set guanyun_port value in collector.yaml
--set-proxy_address=<value> Set proxy_address value in collector.yaml
--set-proxy_username=<value> Set proxy_username value in collector.yaml
--set-proxy_password=<value> Set proxy_password value in collector.yaml -
Validation
The installation directory defaults to
/opt/tingyun-collector/Use the following command to view the running status
systemctl status tingyun-collector
-
After completing the deployment, at the bottom of the Add Collector Deployment page, click View Deployment Status to jump to the Collectors Management page. After about 1 minute, you can view the newly deployed Collector in the Collector list.
Restarting Collector
When you modify the Collector configuration, you need to restart Collector.
Use the following command to restart Collector:
systemctl restart tingyun-collector
Uninstalling Collector
Use the following command to uninstall Collector:
sudo /opt/tingyun-collector/uninstall.sh