Manual Installation Guide
Prerequisites
- Before installing the Agent, please first install the Agent Collector.
- Before installing the Agent, ensure that the local browser time, server time zone, and time are all consistent. If there are multiple servers, ensure that the local browser, all server time zones, and times are consistent. Otherwise, it may affect data accuracy, such as incorrect topology, etc.
Modify Configuration
Before installing the Agent on any application server, please modify the Agent configuration. You can use either of the following two methods to modify the configuration.
Method 1: Modify the Configuration File
Edit the tingyun.properties file in the tingyun directory extracted on the server. Modify the license_key, app_name, and collector.addresses configuration items; otherwise, the Agent cannot collect data or start. For other configuration items, configure as needed.
- license_key: Associated with your Tingyun account. Data collected by the Agent will be uploaded to the account bound to this LicenseKey. Hover the mouse over the account name in the lower left corner, select Account Management in the hover menu, and view the License Key in the Account Information tab.
- app_name: Default application name. It is recommended to configure it as the business name of the application.
- collector.addresses: The address and port of the Agent Collector server, e.g., tingyun.server.com:8080. For high-availability deployment, be sure to configure all Agent Collector server addresses and ports in the same data center, separated by commas.
Example configuration:
license_key=xxxxx
app_name=mall
collector.address=192.168.1.5:7665
Method 2: Add JVM Parameters
Configure JAVA_OPTS in catalina.sh, and add the following three parameters after -javaagent, separated by spaces:
-Dtingyun.app_name=${APP_NAME} -Dtingyun.license_key=${LICENSE_KEY} -Dtingyun.collector.addresses=${COLLECTOR_ADDRESSES}

- -Dtingyun.app_name: Application name, recommended to be the business name of the application.
- -Dtingyun.license_key: Associated with your Tingyun account. Data collected by the Agent will be uploaded to the account bound to this LicenseKey. Hover the mouse over the account name in the lower left corner, select **Account Management** in the hover menu, and view the License Key in the **Account Information** tab.
- -Dtingyun.collector.addresses: The address and port of the Agent Collector server, e.g., tingyun.server.com:8080. For high-availability deployment, be sure to configure all Agent Collector server addresses and ports in the same data center, separated by commas.
Install Java Agent on Tomcat
Tomcat for Linux
-
Modify catalina.sh and configure JAVA_OPTS.
export JAVA_OPTS="$JAVA_OPTS -javaagent:/${path}/tingyun-agent-java.jar" -
Restart Tomcat.
Tomcat for Windows
Most Windows users run Tomcat as a service. Tomcat provides a configuration program to specify the JVM parameters for the service.
-
Click Start > Apache Tomcat (Version) > Configure Tomcat.
-
Select: Java.
-
At the end of the Java Options text box, add:
-javaagent:/${path}/tingyun-agent-java.jar -
Click the Apply button.
-
Restart the Tomcat service.
When setting the -javaagent parameter, use forward slashes as the path separator, for example:
-javaagent:C:/tingyun/tingyun-agent-java.jar
For Tomcat 6, a carriage return is required after the -javaagent parameter. Both forward and backward slashes can be used as path separators.
If you use catalina.bat to start Tomcat, add the following at the top of the batch file:
SET JAVA_OPTS=%JAVA_OPTS% -javaagent:/${path}/tingyun-agent-java.jar
Apache Commons Daemon (jsvc)
The Apache Commons Daemon (jsvc) included with Tomcat 6 does not support the -javaagent parameter. For more information, see: [daemon] JSVC does not support all the standard java 5.0 launcher options
The Apache Commons source code repository already includes a fixed version for this issue. See:
You can also directly download a precompiled jsvc version. This version of jsvc supports setting the -javaagent parameter via the -X prefix.
<jvm-arg>-javaagent:/${path}/tingyun-agent-java.jar</jvm-arg>
Details are as follows:
To add the Agent for all servers in a cluster:
<cluster id="cluster_id">
      ........
    <server-default>
      ...........
        <jvm-arg> -javaagent:/${path}/tingyun-agent-java.jar</jvm-arg>
      ..........
   </server-default>
      ..........
</cluster>
To add the Agent for a specific server in a cluster:
<cluster id="cluster_id">
      ........
    <server id="" address="xxx.xxx.xxx.xxx" port="xxxx">
      ...........
        <jvm-arg> -javaagent:/${path}/tingyun-agent-java.jar</jvm-arg>
      ..........
   </server>
      ..........
</cluster>
Resin pro 4.0+ Production Mode
Resin pro 4.0+ has two installation methods.
First method: Find the resin.properties file in the conf directory, enable the JVM configuration, and add -javaagent:/${path}/tingyun-agent-java.jar, as shown below:
# Arg passed directly to the JVM
jvm_args: -javaagent:/${path}/tingyun-agent-java.jar
# jvm_mode: -server
Second method: Add
<jvm-arg>-javaagent:/${path}/tingyun-agent-java.jar</jvm-arg>
Details are as follows:
To add the Agent for all servers in a cluster:
<cluster id="cluster_id">
      ........
    <server-default>
      ...........
        <jvm-arg> -javaagent:/${path}/tingyun-agent-java.jar</jvm-arg>
      ..........
   </server-default>
      ..........
</cluster>
To add the Agent for a specific server in a cluster:
<cluster id="cluster_id">
      ........
    <server id="" address="xxx.xxx.xxx.xxx" port="xxxx">
      ...........
        <jvm-arg> -javaagent:/${path}/tingyun-agent-java.jar</jvm-arg>
      ..........
   </server>
      ..........
</cluster>
Install Java Agent on WebLogic
Installation on Linux and Mac
Steps to install the Tingyun Java Agent on Linux and Mac operating systems:
-
In the domain's bin directory, find the startWebLogic.sh file.
WEBLOGIC_HOME/user_projects/domains/domain_name/bin/startWeblogic.sh -
Modify the file, and add the Agent configuration between
# START WEBLOGICandecho "starting weblogic with Java version:"....
# START WEBLOGIC
export JAVA_OPTIONS="$JAVA_OPTIONS -javaagent:/${path}/tingyun/tingyun-agent-java.jar"
echo "starting weblogic with Java version:"
... -
Restart WebLogic.
Installation on Windows
Steps to install the Tingyun Java Agent on Windows operating systems:
-
In the domain's bin directory, find the startWebLogic.bat file.
WEBLOGIC_HOME/user_projects/domains/domain_name/bin/startWeblogic.bat -
Modify the file, and add the Agent configuration between
# START WEBLOGICandecho "starting weblogic with Java version:"....
# START WEBLOGIC
set JAVA_OPTIONS=%JAVA_OPTIONS% -javaagent:C:\${path}\tingyun\tingyun-agent-java.jar
echo "starting weblogic with Java version:"
... -
Restart WebLogic.
Installation via Management Console
When using Node Manager to start and stop managed servers, follow these steps to install the Java Agent:
-
In the management console, in the left Domain Structure menu, click Environment > Servers. The server list will appear on the right.
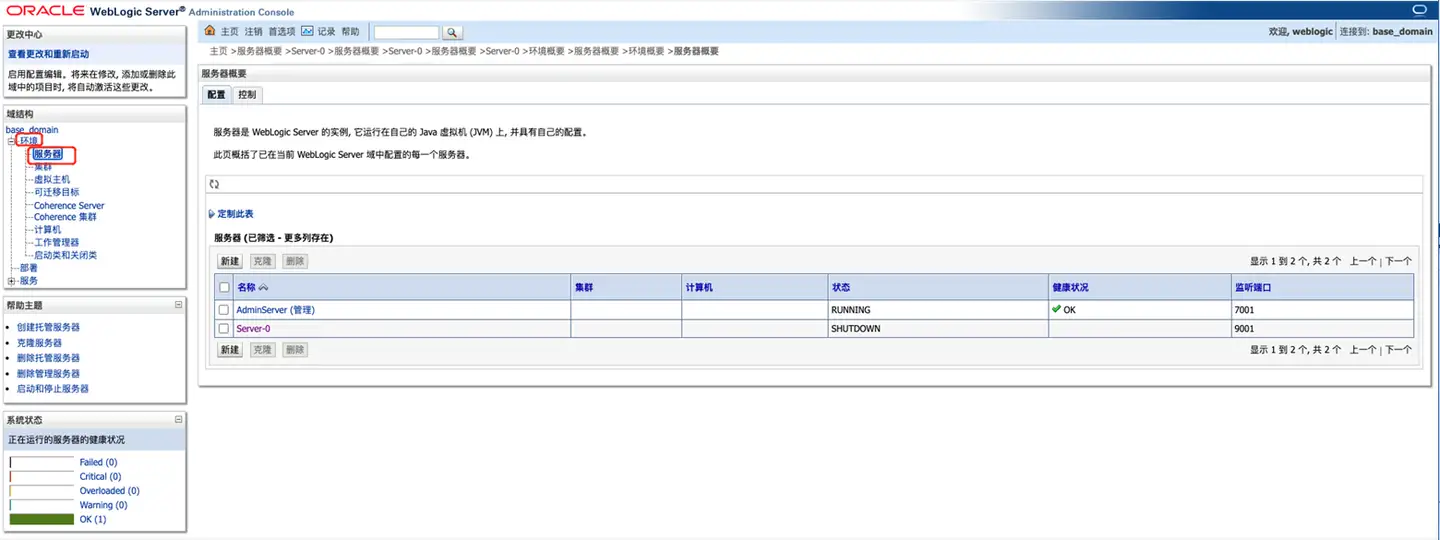
-
Click the name of the server where you want to deploy the Agent, such as server-0, to enter the server settings page.
-
At the top of the page, click the Server Start tab to enter the server start settings page.
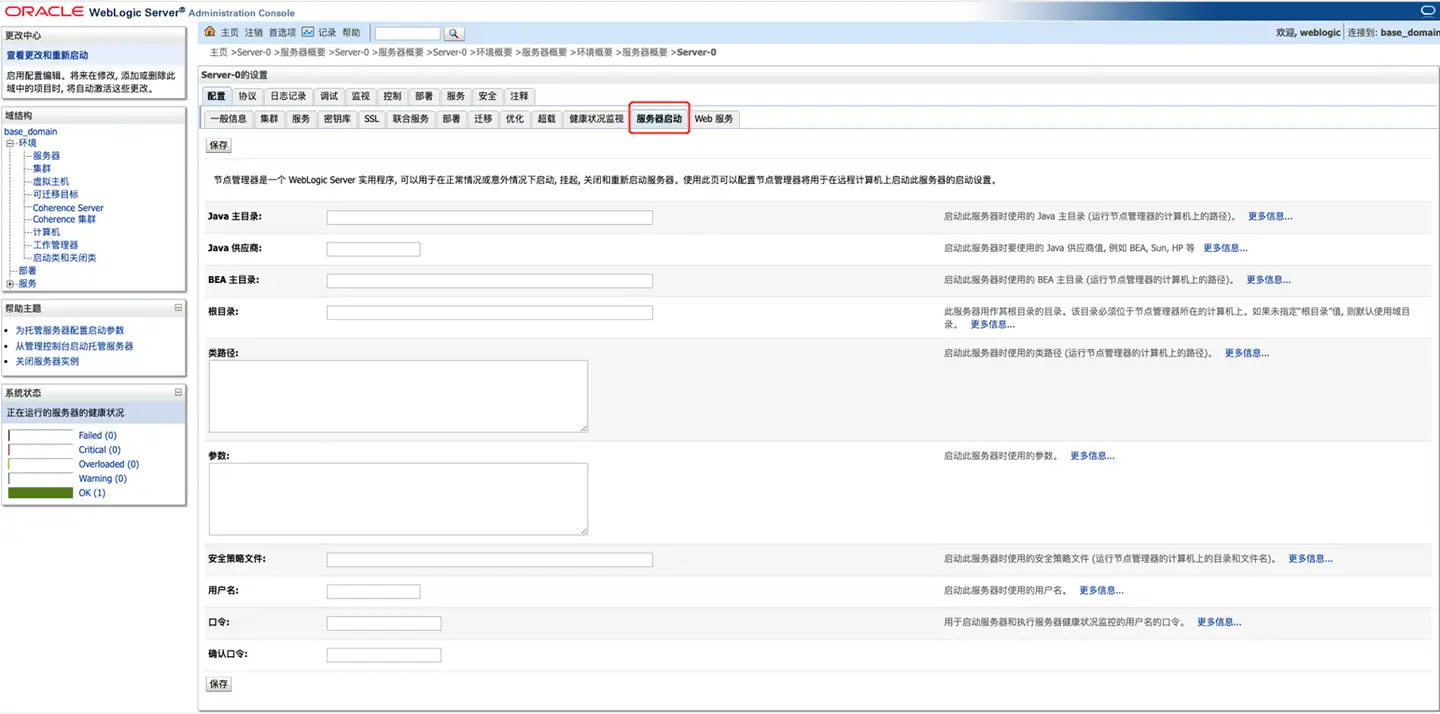
-
In the Arguments text box, add the following content, then click the Save button.
-javaagent:"/${path}/tingyun-agent-java.jar"
-
Restart the service.
Install Java Agent on WebSphere
Compatibility
The Tingyun Java Agent supports all versions of WebSphere 7.0 to 8.5.5, except for some versions of 8.5.0 which are not compatible with the Agent.
Installation on WebSphere
There are two ways to install the Java Agent on WebSphere.
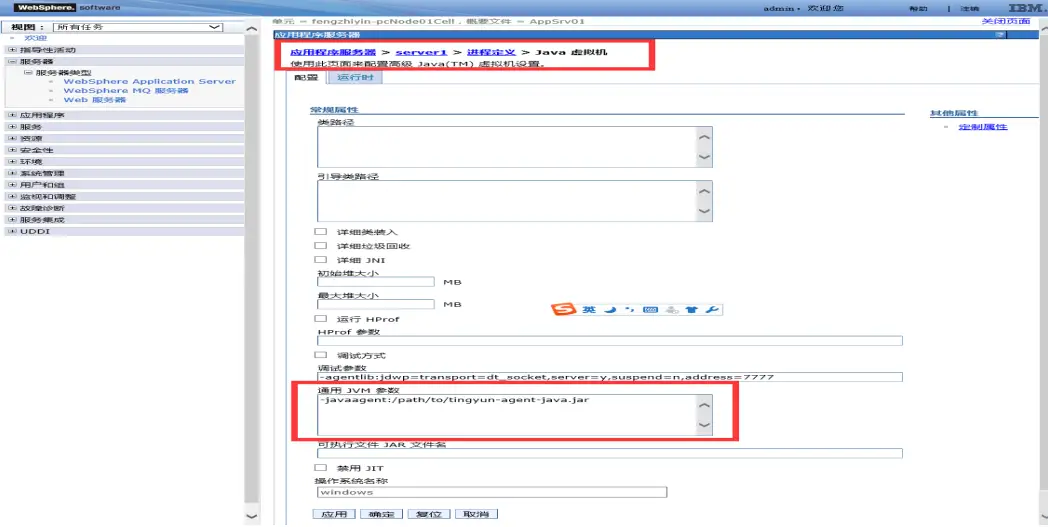
Configure the Agent via Management Console (Recommended)
-
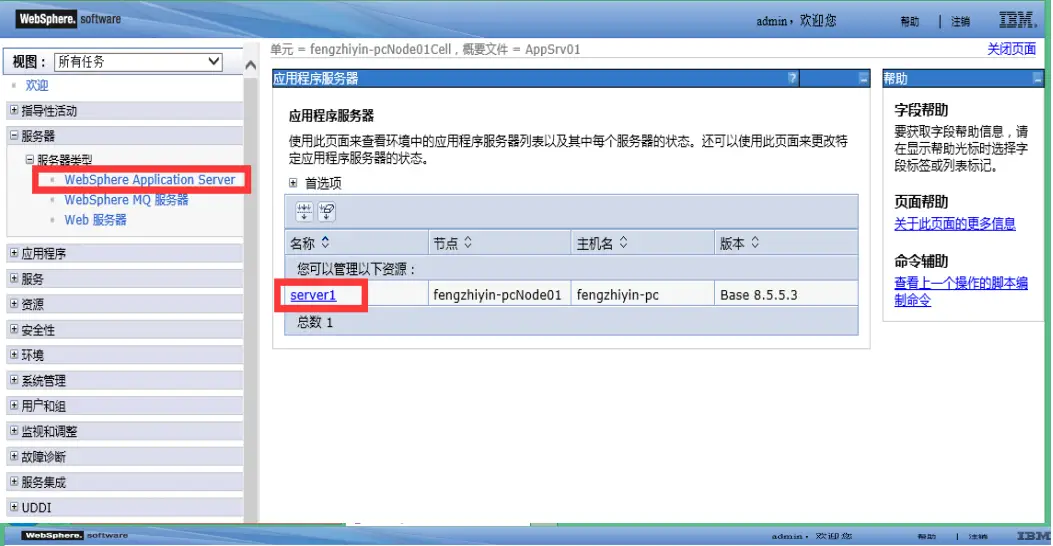
Log in to the management console: https://ip:9043/ibm/console.
-
Browse: Servers > Application servers > (select the target Server).
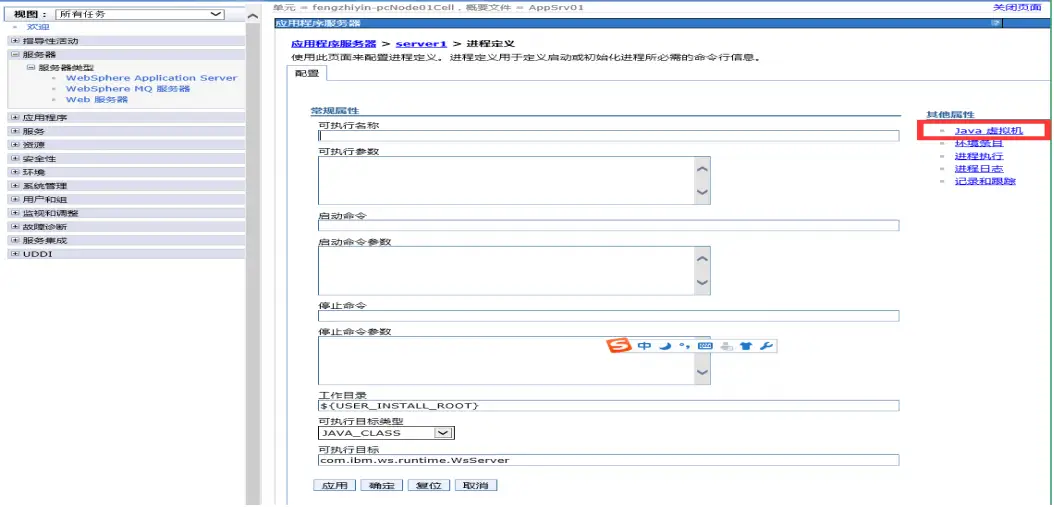
-
Select: Configuration > Service Infrastructure > Java and Process Management > Process Definition > Additional Properties.
-
Under Process Definition > Additional Properties, select Java Virtual Machine.
-
On the Java Virtual Machine page, in the Generic JVM arguments text box, add the following content.
-javaagent:/${path}/tingyun/tingyun-agent-java.jar -
Click the Apply button, then click the Save button.
-
Restart the service.
Note: If Java 2 Security is enabled, you need to grant the Tingyun Agent permission to obtain PMI metrics via JMX.
Refer to the following steps:

Modify server.xml File (Not Recommended)
The file path is approximately: WAS_HOME/AppServer/profiles/app_server_name/config/cells/cell_name/nodes/node_name/servers/server_name/server.xml
   ...
       <jvmEntries  genericJvmArguments="-javaagent:/${path}/tingyun/tingyun-agent-java.jar" >
       ...
       </jvmEntries>
   ...
Security (Java 2 Security) Configuration
If you are using Java 2 Security or WebSphere administrative security, you need to grant execution permissions to all jar files in the tingyun directory. You can enable global security by modifying the java.policy file, or modify the server.policy file for a specific Server.
Grant Permissions to All Servers
-
Modify the java.policy file, the path is approximately:
WAS_HOME/java/jre/lib/security/java.policy -
Add the following content to java.policy. The path after
file:must point to the directory of tingyun-agent-java.jar, and ensure it ends with-. Collector_IP is the IP address of the Agent Collector. If you have multiple Agent Collectors, duplicate thepermission java.net.SocketPermission "Collector_IP","connect,accept,resolve";line for each IP address.grant codeBase "file:/${path}/tingyun/-" {
permission java.security.AllPermission;
permission java.net.SocketPermission "Collector_IP","connect,accept,resolve";
permission java.lang.RuntimePermission "createClassLoader";
permission java.lang.RuntimePermission "getClassLoader";
}; -
Restart the WebSphere application.
Grant Permissions to a Single Server
-
Modify the server.policy file, the path is approximately:
WAS_HOME/AppServer/profiles/APP_SERVER_NAME/properties/server.policy -
Add the following content to java.policy. The path after
file:must point to the directory of tingyun-agent-java.jar, and ensure it ends with-. Collector_IP is the IP address of the Agent Collector. If you have multiple Agent Collectors, duplicate thepermission java.net.SocketPermission "Collector_IP","connect,accept,resolve";line for each IP address.grant codeBase "file:/${path}/tingyun/-" {
permission java.security.AllPermission;
permission java.net.SocketPermission "Collector_IP","connect,accept,resolve";
permission java.lang.RuntimePermission "createClassLoader";
permission java.lang.RuntimePermission "getClassLoader";
}; -
Restart the WebSphere application.
Note: The final security for each Server is determined by the union of
java.policyandserver.policy. Do not configure the same permissions in multiple files.
For the policy file format and syntax, refer to Default Policy Implementation and Policy File Syntax.
Install Java Agent on WildFly
Domain Mode
Modify the <jvm-options/> in domain/configuration/domain.xml to add an <option/>:
<server-group name="main-server-group" profile="full">
  <jvm name="default">
    <jvm-options>
      <option value="-javaagent:/${path}/tingyun-agent-java.jar"/>
    </jvm-options>
  </jvm>
If you are using Windows, use forward slashes / in the path. For example: C:/tingyun/tingyun-agent-java.jar.
Standalone Mode
| Operating System | Description |
|---|---|
| Unix / Mac OS | At the bottom of bin/standalone.conf, add:JAVA_OPTS="$JAVA_OPTS -javaagent:/${path}/tingyun-agent-java.jar" |
| Windows | In bin/standalone.bat, find:rem Setup JBoss specific properties Add after this line: set "JAVA_OPTS=-javaagent:C:/tingyun/tingyun-agent-java.jar %JAVA_OPTS%" |
Install Java Agent on ColdFusion
-
Access the ColdFusion Administrator Console.
-
In the left menu, select: SERVER SETTINGS -> Java and JVM.
-
In the JVM Arguments input box, configure the
-javaagentparameter.-javaagent:/${path}/tingyun-agent-java.jar -
Click Submit Changes.
-
Restart ColdFusion.
Note: The Agent does not currently support ColdFusion Version 9 on IIS.
Install Java Agent on Geronimo
When starting with geronimo run, add tingyun-agent-java.jar to the JAVA_OPTS variable:
export JAVA_OPTS="$JAVA_OPTS -javaagent:/${path}/tingyun-agent-java.jar" && geronimo run
Install Java Agent on Grails
Start Grails with run-app
When starting the service with grails run-app, add the -javaagent parameter before run-app:
grails -noreloading -javaagent:/${path}/tingyun-agent-java.jar run-app
Note: The
-noreloadingparameter is only required for Grails 2.x versions.
Start Grails with run-war
Modify the {your-grails-app}/conf/BuildConfig.groovy file, and add the -javaagent parameter to the grails.tomcat.jvmArgs property:
grails.tomcat.jvmArgs = ["-javaagent:/${path}/tingyun-agent-java.jar"]
Install Java Agent on Apusic
Steps to install the Agent:
-
Embed the Tingyun Agent.
Go to /${path}/domains/mydomain/bin directory and edit the startapusic file.
JVM_OPTS="$OTHERS_JVMOPTS $MEMORY_JVMOPTS $GC_JVMOPTS -javaagent:/${path}/tingyun-agent-java.jar " -
Restart the Apusic service.
Tip: To start the Apusic service:
Go to
/${path}/domains/mydomain/bindirectory and runnohup ./startapusic &.
Install Java Agent on Zhongchuang (InforSuite)
There are two ways to install the Java Agent on Zhongchuang.
Configure the Agent via Management Console (Recommended)
-
In the Zhongchuang application server console, click Configuration Management -> server-config -> JVM Settings -> JVM Options -> Add JVM Option.
-javaagent:/${path}/AppServer/as/domains/tingyun/tingyun-agent-java.jar -
Save and restart the InforSuite service.
Tip: To start the InforSuite service:
Go to
/${path}/AppServer/as/bindirectory, run./asadmin, then at the asadmin> prompt, enter start-domain.
Modify domain.xml File (Not Recommended)
The approximate path for the Java Agent configuration file is:
/${path}/AppServer/as/domains/domain1/config/domain.xml
The JVM configuration for each server group can be set in the domain.xml file.
<server-group name="main-server-group" profile="full">
  <jvm name="default">
    <jvm-options>
      <option value="-javaagent:/${path}/tingyun-agent-java.jar"/>
    </jvm-options>
  </jvm>
</server-group>
Install Java Agent on TongWeb
Basic Startup Configuration
To embed the Tingyun Agent, go to /${path}/bin directory and edit external.vmoptions.
JAVA_OPTS="${JAVA_OPTS} -javaagent:/${path}/tingyun/tingyun-agent-java.jar"
Permission Configuration
Ensure that the user starting TongWeb has read and write permissions for agent_install_path. This consists of two parts:
-
System read/write permissions. You can set the owner of the installation path agentPath to the user starting TongWeb:
chown -R <user>:<group> <agent_install_path>
chmod u+rw <agentPath> -
If TongWeb security management is enabled, add the following code to
/${path}/conf/tongweb.policy:grant codeBase "file:/<agent_install_path>/-"{
permission java.security.AllPermission;
};
After completing the startup script and permission configuration, restart the TongWeb service. If you use the root user to start TongWeb, you do not need to modify the system read/write permission configuration.
Note: To start the TongWeb service:
Go to
/${path}/bindirectory and runnohup ./startserver.sh &.
Spring Boot / Standalone Jar / Other Application Servers
The Java Agent can run on any application server, as long as you configure the following in the startup parameters:
java -javaagent:/${path}/tingyun-agent-java.jar -jar ${your_app}.jar
Note: -javaagent must be placed before -jar.